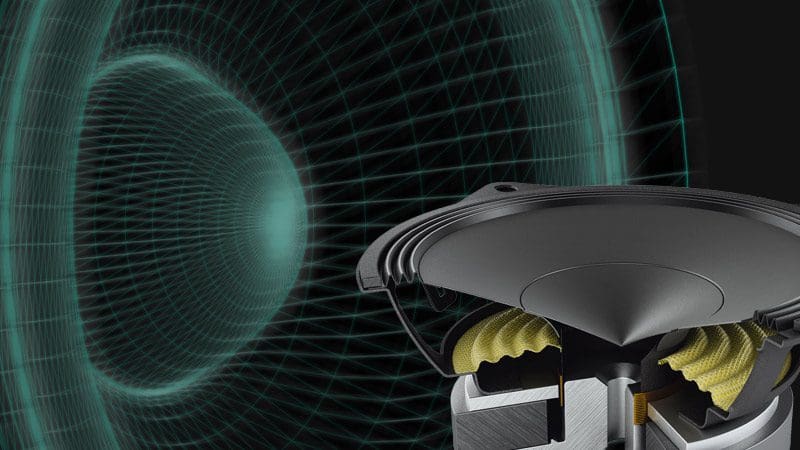
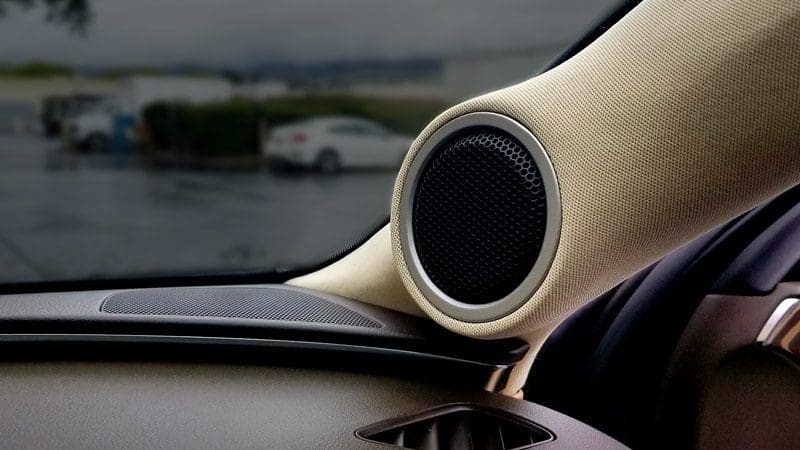
 We recently talked about the difference between good and great speakers. In a nutshell, when you choose great speakers, you get more power handling, the potential for more output and dramatically improved clarity, thanks to a reduction in distortion. In this issue of Bang for Your Buck, we are going to look at two car audio speaker technologies that reduce distortion. This article will be a true behind-the-scenes look at how speakers work.
Current Flow and Magnetic Fields
According to Lenz’s law, when current flows through a conductor, a magnetic field is created around the conductor. At the same time, when we move a conductor through a magnetic field, a current is created in the conductor.
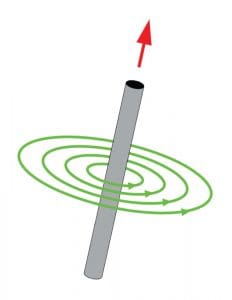
The diagram above shows a conductor (in grey) with a current flowing through it. The green lines show the direction of the magnetic field around the conductor.
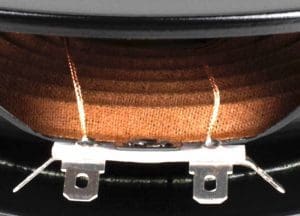
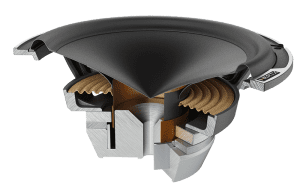
In a speaker, the voice coil is a coil of wire wrapped around a bobbin or former. Current from our amplifier flows through this conductor and sets up a magnetic field around the voice coil. We use this property to move the speaker in and out of the basket. When the polarity of the magnetic field is the same as that of the fixed magnet, the similar magnetic fields repel each other, and the speaker moves forward. When the polarity of the magnetic field reverses, the speaker is attracted to the magnetic field and the speaker moves rearwards.
Unfortunately, when it comes to dealing with alternating current, the behavior of magnetic fields can work against you. When the polarity of the current reverses, it has to fight against the magnetic field it created. You can think of it as momentum. If marbles are rolling across the floor, it takes energy to make them change direction. This opposition to the change in the flow of current is called inductance. The electrical momentum resists the desire to set up a new magnetic field of the opposite polarity.
Managing Voice Coil Inductance
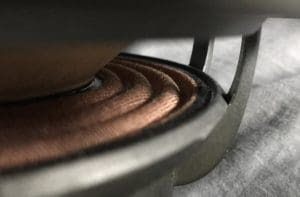
The amount of inductance in a speaker voice coil is determined by several factors. The size of the voice coil conductor, the geometry of the conductor, the number of layers in the voice coil and the proximity of the voice coil to the top plate and the pole piece – just to name a few.
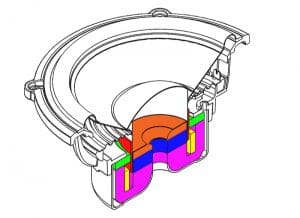 So, how does inductance cause distortion in a speaker? As you can see in the diagram above when the voice coil winding (in red) is at rest, it is centered on the top plate (in green). As the cone moves down, more of the voice coil is beside the magnet (in blue) and the pole piece (in pink). Conversely, as the come moves outward, less of the cone is near the pole. In a conventional speaker design, the changes in proximity to the steel pole piece cause changes in inductance. As the inductance decreases, there is less opposition to the flow of high-frequency current and an increase in high-frequency performance. Changes in performance based on the position of the speaker cone result in distortion.
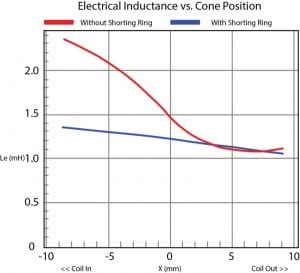
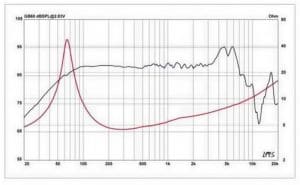
The image above shows the inductance of a voice coil relative to its position in the speaker. The red curve is the inductance graph of a conventional speaker. The blue curve is the inductance graph of a speaker that includes an aluminum shorting ring at the bottom of the T-yoke. As you can see in the image above, without the shorting ring, the speaker has dramatically different inductive characteristics depending on the position of the cone.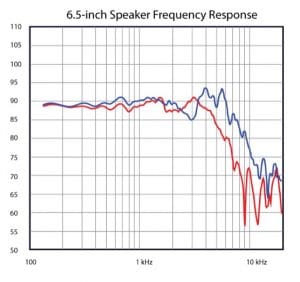 The graph above shows the frequency response of a speaker without a shorting ring (in red) and that of a very similar speaker with a shorting ring (in blue). As is clearly evident, the inclusion of a shorting ring dramatically improves the high-frequency performance of a speaker. Further improvements in linearity can be achieved by including a copper cap on top of the T-yoke.
When you are shopping for great speakers, look for inductance-reducing caps on all speakers (subwoofers, midrange drivers and tweeters), and in larger speakers (subwoofers and midrange drivers) where the room is available in the motor assembly, look for the presence of a shorting ring.
Comparing Inductance Numbers
If we can’t determine whether a speaker has a design that mitigates changes in inductive characteristics, can we simply look at the specifications? They most certainly do provide a hint. A 6.5-inch woofer without a cap or shorting ring may have an inductance of 0.7 to 1.1 mH (millihenries), whereas a speaker with these technologies will be closer to 0.1 or 0.2mH. In terms of how they sound, all other design criteria being equal, the driver with the lower inductance will have better high-frequency performance and produce less distortion.
Speaker Suspension Nonlinearities
The purpose of the spider (also known as a damper) is to keep the voice coil laterally centered in the air gap between the top plate and the pole piece and to help return the cone to the resting position when the audio signal is removed.
Picking the perfect damper stiffness (compliance) for a given cone mass and desired resonant frequency is one of the biggest balancing acts involved in designing a speaker. If the spider is too stiff, the resonant frequency of the speaker may be too high for the desired application and its efficiency may suffer.
A variety of materials are available, as well as different sizes and different geometries. A spider is a spring. Some spiders are designed for linear compliance and some are progressive. More importantly, because of variances in voice coil winding height and basket design, some spiders include an offset mounting lip. This is called a cupped spider. This cup or spacer allows the spider to attach to the voice coil former above the winding, then connect to the chassis while keeping the voice coil vertically centered in the magnetic gap.
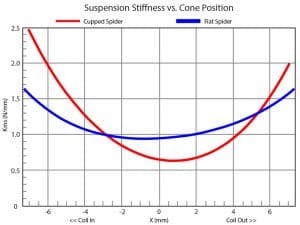
The above graph shows the suspension compliance of two different 6.5-inch diameter speakers based on the position of the cone. The graph in red shows the compliance of a speaker that uses a cupped spider. You can see that at 6.5mm of inward travel, the suspension is 25 percent stiffer than at 6.5mm of outward travel. The blue graph shows a similarly sized speaker with a flat spider. Though the overall compliance is different, the behavior in the forward and rearward directions is nearly identical.
What To Look For in a Spider
Ultimately, we want the spider to exert the same amount of force on the cone and voice coil as it moves forward or backward from the rest position. The amount of force should not change based on the direction of cone travel. Imagine the distortion created by a speaker playing a sine wave where the cone doesn’t move as far rearward for a given amount of current as it moves forward. As such, try to avoid speakers that use cupped spiders.
Hear Different Car Audio Speaker Technologies In Person
The next time you head to your local mobile enhancement retailer to listen to new speakers, choose two wildly different price points and listen to the same portion of a song on each speaker. Listen to them at a reasonably loud volume level, and position yourself across the room. Switch back and forth until you determine the differences.
Then, add a third speaker option, priced and featured somewhere in the middle. Make the same comparison with this new speaker and the expensive speakers. Once you have listened to the speakers, ask to look at a sample of each and see if you can correlate some of the design characteristics we have discussed with their performance. It’s not only a great way to audition products but to learn about what makes one car audio speaker technology or design better than another.
This article is written and produced by the team at www.BestCarAudio.com. Reproduction or use of any kind is prohibited without the express written permission of 1sixty8 media.
 It should be no surprise that your choice of speakers has the biggest impact on the sound quality of your car audio system. With that said, many consumers simply don’t understand what separates one speaker from another in terms of performance and value. In this installment of Bang for Your Buck, we are going to talk about
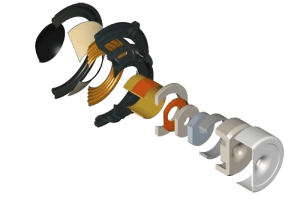
 Cameras are a good analogy for speaker performance. An inexpensive digital camera hanging on a peg in a big-box store will take a picture of anything. You’ll be able to discern the content of the photo without any problem.
 Sadly, very few companies talk about
 In a recent article, we discussed the features to look for when choosing a new
  In the good old days of car audio, print magazines (remember those?) would publish product test reports that included both listening and bench test information. While at least one these publications still exists, the plethora of numerical information simply isn’t disseminated the way it used to be. That means shoppers have to rely on specifications printed by the manufacturer. In most cases, these numbers are accurate and serve as a good foundation for comparing certain performance characteristics of a product.
 Interestingly enough, pre-amp output voltage is tied directly to the signal-to-noise ratio measurement of the source unit and the
  Over the past few years, the perceived quality of radio tuners in
 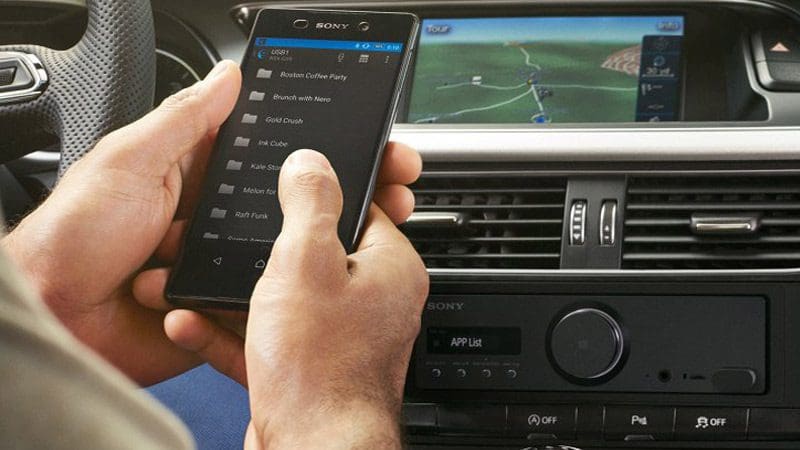 A long time ago, a friend of mine told me always to ask a salesperson what I would get if I spent 10 percent to 15 percent more on an item I wanted to purchase. At the time, the discussion was related to a large tube-style television. Let’s say the TV I was looking at sold for $800. If stepping up to a $900 model resulted in a better picture, or the addition of a feature that I would enjoy, then it would be worth the investment. In the mobile electronics industry, or perhaps consumer electronics in general, few customers ask, “What do I get for a little bit more?” This article will be the first of many that discuss the true performance features of mobile electronics products. For this article, we’ll look at better source units. What do you get when you spend more and how you benefit from those feature or performance upgrades?
 It should be no surprise that the majority of
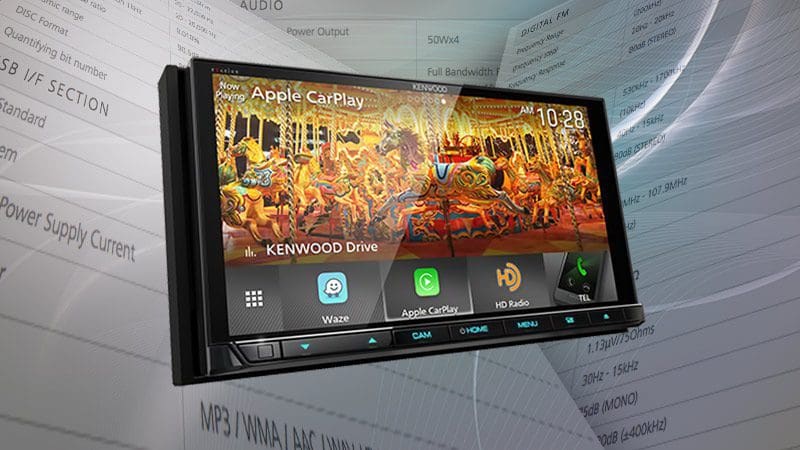
 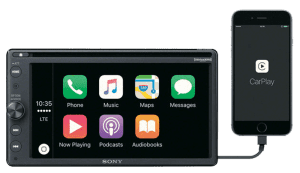 When you are shopping for a new receiver, you may want to consider asking about Apple CarPlay and Android Auto. These smartphone solutions use voice recognition technologies to make performing common tasks easier and safer. You can send a text message, choose the music you want to listen to or get navigation directions, all by simply talking to your radio. These technologies have associated hardware requirements put forth by Apple and Google, and include technology licensing costs. As such, they cost extra to purchase, but they are well worth the investment.
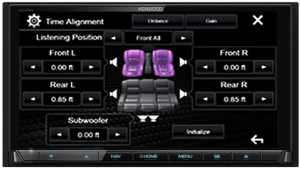 If you are passionate about your music, look for a source unit that includes crossovers. The ability to filter the signals created by the source unit will let you add a subwoofer to improve the performance of your audio system dramatically. Having simple bass, midrange and treble controls may be adequate to let you adjust your sound system. More elaborate
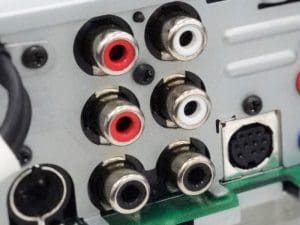
 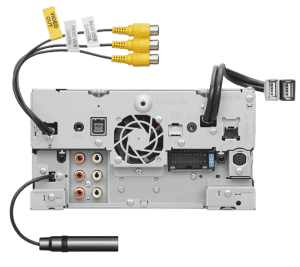 Hooking things up to your radio is part of the fun of upgrading your vehicle. The most basic of source units may include Bluetooth, a USB port, an auxiliary input, a backup camera connection and preamp outputs for external amplifiers. As you move up through a brand’s models, you’ll discover functions like SiriusXM compatibility, multiple USB connections, support for more than one phone, multiple camera inputs, multiple video inputs, HDMI input, multi-zone outputs and more. Do your homework before you go shopping. Decide what functions you want before you leave the house. Your retailer can start with that to help you choose a solution.
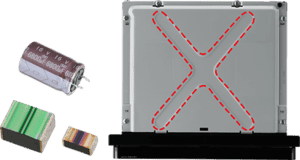
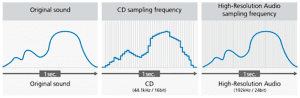 Another important consideration is digital media compatibility. Most systems will play MP3 and WMA audio files. As you step up in features, you gain support for AAC, WAV and FLAC files. Upgrading even further gets you support for high-resolution audio formats that offer audio content beyond 20kHz. The second consideration for digital media compatibility is video. Determining whether a source unit will play video files is the first step. Second is the type of files. MPEG and WMV file playback is found on mid-level systems. Premium solutions add H.264 formats and often support MKV containers.
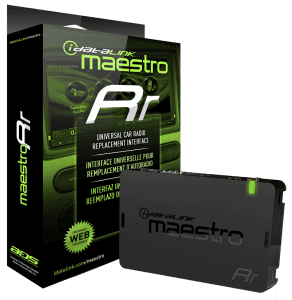 Almost every multimedia receiver includes a steering wheel control interface connection. This connection allows your installer to configure an external interface that will allow the audio adjustment buttons on your steering wheel to work with your new radio. If you are looking for advanced integration, the iDatalink Maestro RR interface allows bidirectional communication with the CAN bus in your vehicle and many applications, as well as compatibility with factory backup cameras, UBS ports and infotainment solutions like Uconnect and Ford Sync. Depending on the vehicle and trim level, climate settings can also be controlled through the Maestro RR.