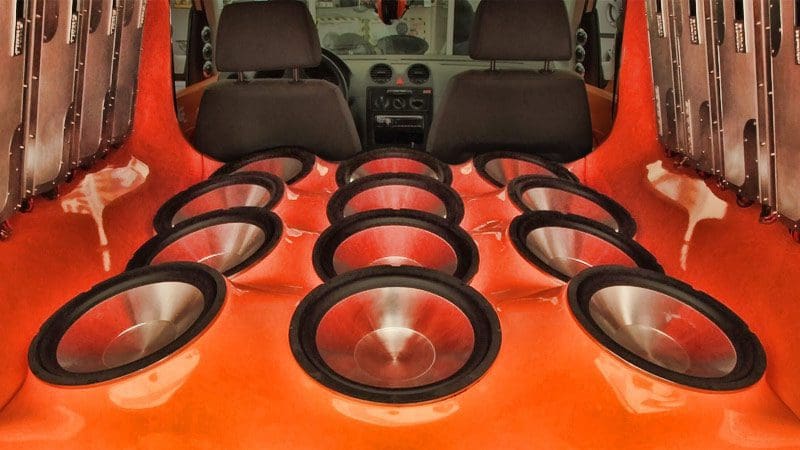
 When you think of the stereotypical car audio system, most people imagine compact cars with large subwoofers in the trunk being driven around late at night, rattling the china in the cupboard and being annoying. While many stereotypical bassheads are still out there giving the industry a bad reputation, a much larger group of enthusiasts thrives on hearing basshead songs on a reference-quality sound system.
Imagine you are sitting at the console at Abbey Road Studios in London, the Record Plant in Los Angeles or even Deadmau5’s reference-level home studio in Ontario, Canada. You’re listening to your favorite artist’s latest album the same way the mastering technician wanted you to hear it. For an audiophile, this would be the Holy Grail of musical experiences.
For those of us who love to hear our music the way the artist and producers truly intended, a premium audio system in your car is a great escape from reality while on your way to work, school or home. As a follow up to our Bang For Your Buck series on subwoofers, we decided it would be fun to look into some real tweaky, geeky basshead music. No, not necessarily the latest jams from Jay-Z or Flo Rida, but tracks that have bass so deep that you can typically only feel it — if your system is up to the challenge!
Finding Basshead Songs
We put the call out to our industry friends and asked them for their bass infrasonic subwoofer demos. The majority of the list came back with tracks with awesome bass lines that varied in frequency from 50Hz to around 30Hz. While these are a LOT of fun and easy to make very, very loud, that’s not what we are after in this article. We want the rumble. We want tracks that send your subwoofers into convulsions at incredible excursion levels. Call them Voice Coil Cookers or Woofer Killers; these tracks offer amazing bass lines that most systems struggle to reproduce.
We sorted through about 75 tracks using Adobe Audition. Audition allows us to look at the spectral content of a track quickly to find out how low it extends. We’ve included spectral content charts for each track that shows frequency along the vertical scale, time across the horizontal scale and amplitude shown as color intensity from black through purple and orange. Brighter colors mean that the information at those frequencies is louder. We’ve thrown in a few honorable mentions that are a lot of fun, even if they don’t strictly meet our criteria for infrasonic fun!
Strap in friends, this is going to be a lot of fun. Oh, and if you blow up your subwoofers trying to play these, uh, sorry, or maybe, you’re welcome!
“Boom Boom Pow” from The Black Eyed Peas album The E.N.D. (language)
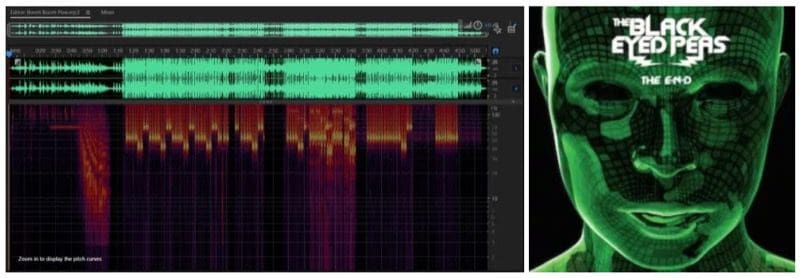 The monologue introduction to “Boom Boom Pow” by will.i.am builds to a crescendo from the 45-second mark, peaking with infrasonic information from :50 to 1:03. Content during this time extends solidly down to 7 Hz. There is another drop at 2:18, and the section from 3:13 to 3:42 contains a lot of infrasonic content. If your system is up to the challenge, this track has it all: a solid conventional bass line and enough content below 20Hz to make any true basshead happy!
“Hoods Run Down” from Lil Wyte’s album Phinally Phamous (explicit lyrics)
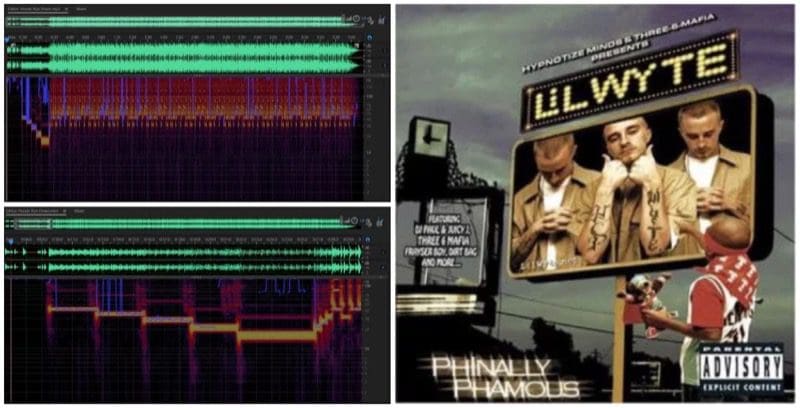 Often referred to as Bass Check, “Hoods Run Down” by Lil Wyte is a rap song that starts with an introduction and the DJ plays five sequentially lower tones. The first is centered at 41Hz, and most factory sound systems can handle this one with no problem. The second “beat” is at 35Hz, and you are going to need at least a small sub to catch this one. The third drop is centered around 27Hz and will tax premium factory systems and aftermarket systems tuned to boom rather than rumble. Now things are getting fun! The second-to-last tone is centered at 20Hz and is going to be a workout for most vented enclosures. Pay attention; speaker damage may ensue! The last beat is centered around 16Hz. You are going to need serious cone area and power to feel this one with any authority. The rest of the song continues with a standard bassline with information around 30Hz. A good workout for your stereo and a nice gentle massage for the ride home.
“3 A.M.” fea. Timbaland from Young Jeezy’s album The Inspiration (explicit lyrics)
 Another classic rap track, “3 A.M.” features a steady bass line that extends down to around 30Hz, giving almost any sound system a chance to sound great. Interspersed randomly through the track are bass drops down to the single digits. There is lots of 9Hz content at the :57 and 2:01 marks. These don’t last long, but they are reasonably loud. You’ll hear 10-cycle beats at 0:37, 1:03, 1:54, 2:45, 3:11 and 3:37. There is lots of 50Hz content during these drops, so it might be hard to pick them out, but they are there.
“Jurassic Lunch” from Erich Kunzel & The Cincinnati Pops Orchestra’s The Great Fantasy Adventure Album
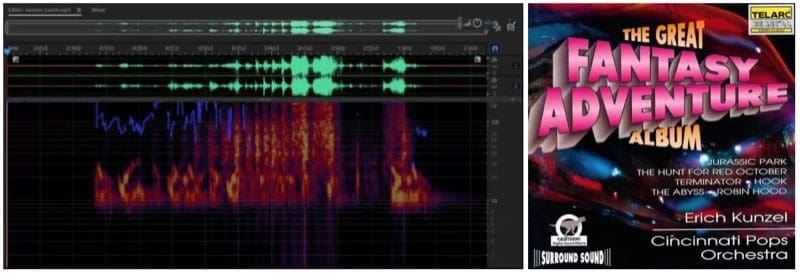 This is more of a demo track than a song. Included on The Great Fantasy Adventure Album with main title themes from movies like Terminator 2, Clash of the Titans, Total Recall and The Abyss, “Jurassic Lunch” is a short 1:11 track at the end of the album. The track starts with birds chirping in the jungle. At the 13-second mark, a series of pulsations centered at 12Hz and 24Hz start. These continue to the 29-second mark, where harmonics are included that provide content above 30 cycles. It’s only then that you realize you are hearing the footsteps of the Tyrannosaurus rex stomping through the Jungle. Around the 39-second mark, you start to hear tree branches breaking with each step, and then at the 45-second mark, the roar of the Rex overpowers the track as he devours his prey. Of course, Kunzel included lots of bone-cracking and crunching around the 51-second mark. The Rex savors his meal from the 51- to 56-second mark, where he rewards himself with a giant burp that peaks with information down to 10Hz at the 59-second mark. This track serves as an awesome demonstration of a true subwoofer system.
“White Rabbit” from the Blue Man Group album The Complex
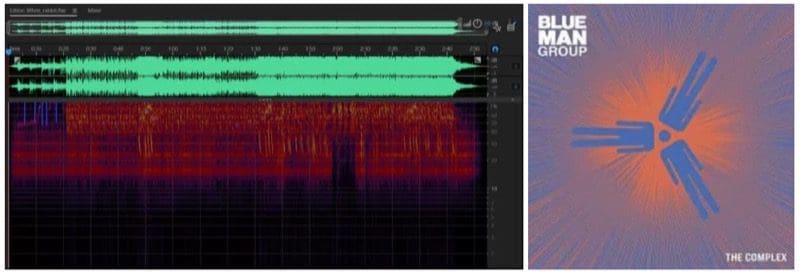 This remake of “White Rabbit” by Jefferson Airplane features the required tuned PVC tubing percussion that has made Blue Man Group so unique. Though this track doesn’t share the intense infrasonic peaks of our other suggestions, it maintains an impressive level of 15-cycle content throughout the almost three-minute-long track. There is very evenly dispersed mid-bass energy in this track as well — a great challenge for your door speakers.
“Terminator Theme” from Erich Kunzel & The Cincinnati Pops Orchestra’s The Great Fantasy Adventure Album
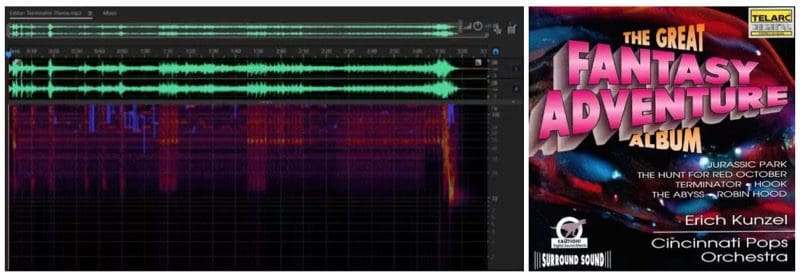 Another fun track from The Great Fantasy Adventure Album is the Terminator theme. This haunting track is full of special effects and mechanical sounds that remind listeners of the end scene of Terminator 2 as the machine slowly lowers himself into the mass of molten steel in the refinery. While most of the percussion comes from kettle drums in the 47-48 Hz range, the closing of the track features an explosion that starts at the 3:11 mark and peaks with 11Hz information from 3:14 to 3:16. A fitting ending to a great track.
J.S. Bach’s Toccata and Fugue in D Minor from Don Dorsey’s album Bachbusters
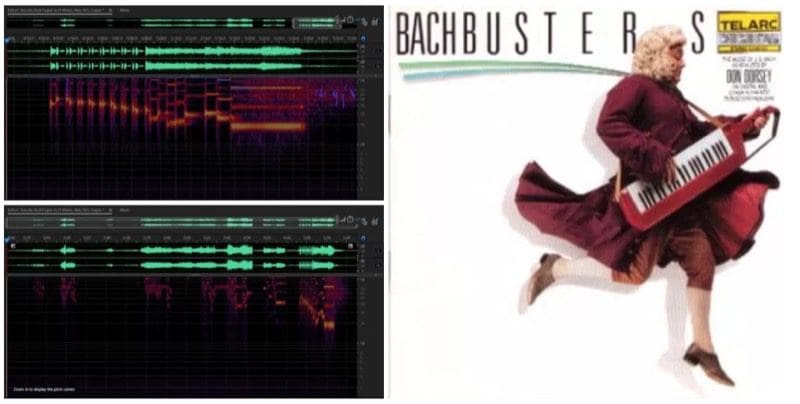 This track goes back, waaaay back! Scholars think that Bach wrote this classic piece of organ music between 1704 and 1750 (when he died). Even those who don’t listen to classical music recognize this track. Don Dorsey released Bachbusters, a synthesizer-based take on some of Johann Sebastian Bach’s greatest pieces, in 1985. The album took first place on the Billboard classical music chart and has been popular with car audio enthusiasts ever since.
This track culminates with the synthesized organ playing deeper and deeper until the 5:17 mark where a sustained 19 Hz note serves as the climax and is sustained for a full 11 seconds. Heh, heh.. Fun!
“Centipede” from the Knife Party album Rage Valley
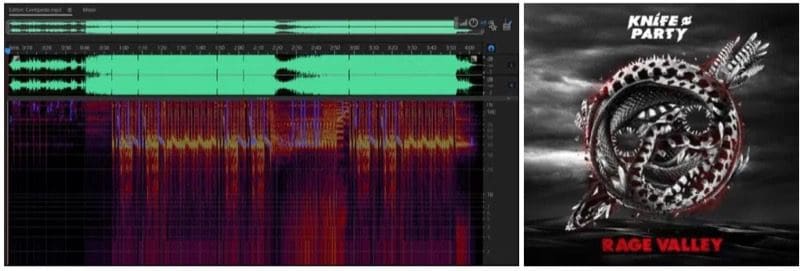 There had to be some dubstep in this list somewhere, right? “Centipede” is a somewhat creepy track that is full of fun bass. While the focus of the bass line is around 40Hz, the track contains content with good output levels down to the 10Hz range. While we doubt most clubs could reproduce this infrasonic information with serious output levels, the sensation of listening to this in a well-designed mobile audio system would be fantastic. It’s also really loud: The VU meters remain pinned at the 0dB mark for the majority of the track.
Tchaikovsky’s 1812 Overture performed by Erich Kunzel and the Cincinnati Symphony Orchestra
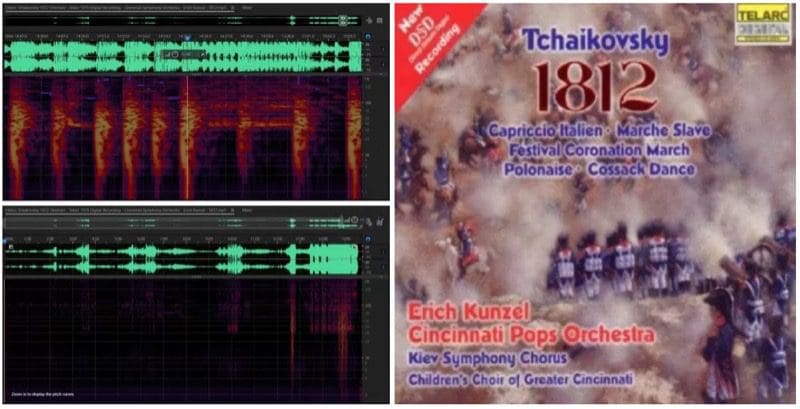 Another all-time-classic classical recording is Tchaikovsky’s 1812 Overture. This recording is known for its jaw-dropping cannon blasts at the end. When played back on a vinyl record, all but the very best turntable configurations will result in the needle jumping out of the track as the cannons go off. The first five cannon blasts appear at 12:36 into the track. The second and most impressive group begins at 14:41, with the blast at 14:55 containing low-frequency energy that extends down to nearly DC levels. Call it one to two Hertz if you want – it makes no difference.
“Purple Lamborghini” by Skrillex and Rick Ross on Suicide Squad: The Album (explicit lyrics)
 “Purple Lamborghini” won a Grammy Award for Best Song Written for Visual Media. This rap track contains a bass line that is centered around 38Hz for the majority of the track. But the fun doesn’t stop there: Four times in the track, the bass sweeps from 50 down to 22Hz with impressive output. The video features Rick Ross, Skrillex and none other than Jared Leto in full Joker garb.
“Put On” fea. Kanye West from Young Jeezy’s album The Recession (explicit lyrics)
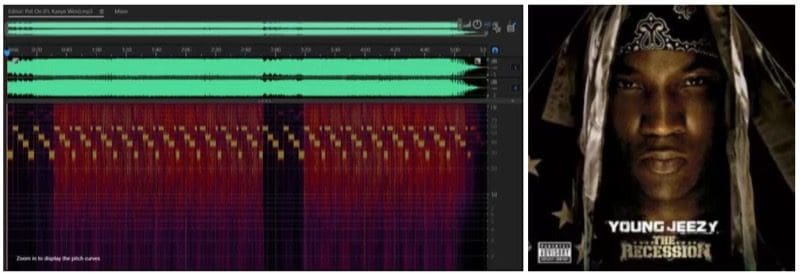 “Put On” makes our list with what we’ll call an honorable mention. The track doesn’t dig hard into the infrasonic region but contains four drops that repeat through the entire track. The first is up at 55Hz and is classic rap music bass. The second is at 44Hz and the third is at 36Hz, giving your body a nice massage. The last is centered around 27Hz and will give your subwoofers a good workout. We included this track because the 27Hz bass line appears no less than 22 times in this 5:21-second track.
“This Means War” from the Avenged Sevenfold album Hail to The King
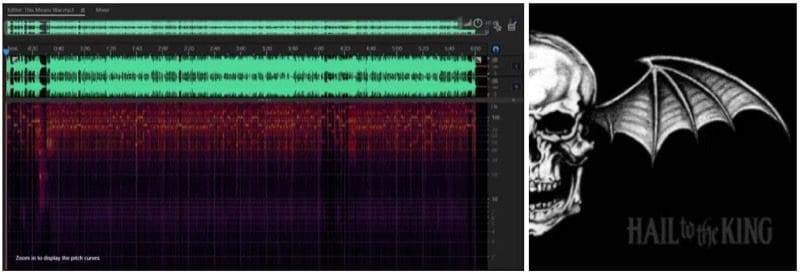 The second of our three Honorable Mention tracks is “This Means War” by Avenged Sevenfold. This rock track opens with well-recorded percussion and guitar. At the 25-second mark, there is a rumble of thunder with great content down to 20 Hz that slowly fades to the 30-second mark. The remainder of the track only gets down to about 40Hz, but the kick drum is well-recorded and the entire track is well worth listening to.
“Supercut” from Lorde’s album Melodrama
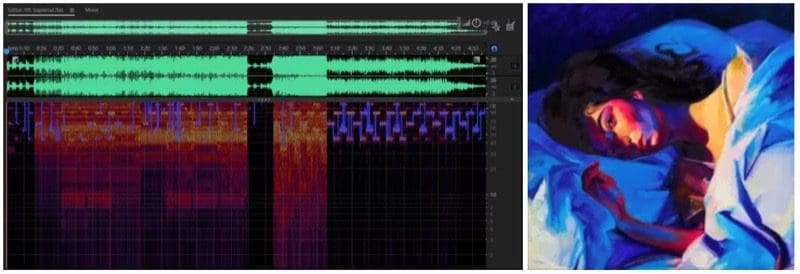 Another honorable mention is Lorde’s “Supercut.” Though the main bass line remains focused between 40 and 60 Hz for the majority of the track, the section of the song from 2:34 to 3:05 has a surprising amount of information that extends down to 10 cycles at a moderate level.
“Supermarket Flowers” from Ed Sheeran’s album ÷ (Divide)
 Winning our “what the heck is that doing there?” award is “Supermarket Flowers” by Ed Sheeran. This track features Sheeran accompanied by a piano for the majority of the track. At the 2:08 mark, a synthesizer comes in to add some a gentle bass line to the track. The lowest notes are 28Hz at the 2:32 mark. While not the infrasonic content we were searching for, this remains a nice surprise in what would be described as a nice song.
This article is written and produced by the team at www.BestCarAudio.com. Reproduction or use of any kind is prohibited without the express written permission of 1sixty8 media.
 Beyond the features and design of a subwoofer, no single factor affects the performance of a subwoofer system more than
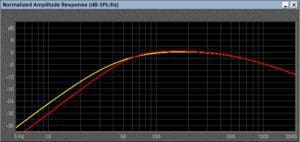 As you can see, above 60Hz, the smaller enclosure is a little bit louder but remains within a decibel or two. Below 50Hz is where things start to vary more. The larger enclosure is 2.15 dB louder at 35Hz and 3.35 dB louder at 25 Hz. While it might not appear dramatic, 3dB is the equivalent of having twice as much power driving the subwoofer. However, this increase in efficiency comes with no thermal power handling penalty.
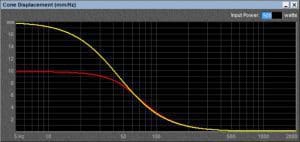 Once again, above 60Hz, there is minimal difference in the excursion between the two drivers. Below that, the larger volume of air in the big enclosure has less effect on the stiffness of the subwoofer system. The result is the subwoofer moves farther for each watt of power. If you compare the excursion graph to the frequency response graph, the efficiency levels are directly correlated.
 The second popular option for a subwoofer enclosure is a
  Now, while most vented enclosures are larger than their sealed brethren, the benefit is often an increase in output that is potentially more than having two subs in a sealed design. In fact, this vented design is louder from 20 to 60Hz than three identical subs in an enclosure that is 50% larger (1.8 cubic feet).
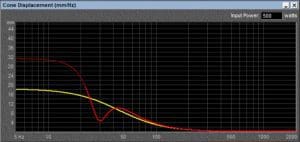 This reduction in cone excursion increases physical power handling and also reduces distortion – as long as you have designed and constructed the vent properly. Vents need to have a large enough area so that air velocity in the vent is kept to a minimum. The mouth of the vent also needs to have a large radius
 Bandpass enclosures are called that because they not only act as a high-pass filter but as a low-pass filter as well. A typical bandpass enclosure features two chambers. The woofer is mounted between these chambers. In a single-tuned enclosure (often referred to as a fourth-order bandpass or single- reflex bandpass), one of the chambers includes a vent from which all the sound is created. A benefit of this design is the ability to feed that vent through an opening in a rear parcel shelf or similar to ensure coupling with the interior of the vehicle.
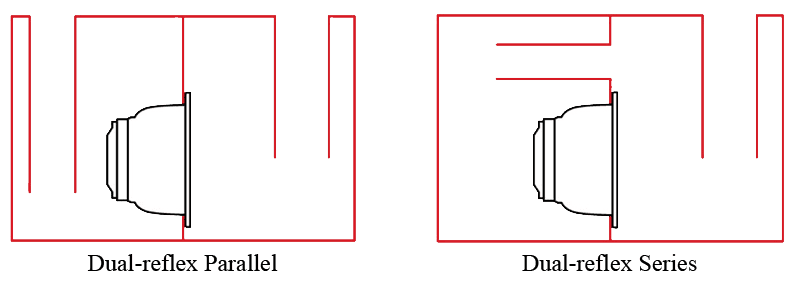 The second bandpass enclosure design is a Double-tuned design where both the front and rear chambers are vented. In a Series-tuned bandpass enclosure, the large rear chamber vent feeds into the front chamber. In a parallel-tuned design, the vents from each chamber feed directly into the listening area. Double-tuned bandpass designs are often referred to a sixth-order or dual-reflex designs.
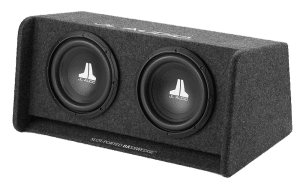 A quick note on “basic” subwoofer systems. Over the years, we’ve seen a LOT of retailers offer “bass packages” that include a sub, amplifier, enclosure and often a wiring kit. In the majority of these packages, the retailer has paired an inexpensive sub with an inexpensive amp and a sealed subwoofer enclosure to minimize the total cost of the system. When you are limited in
 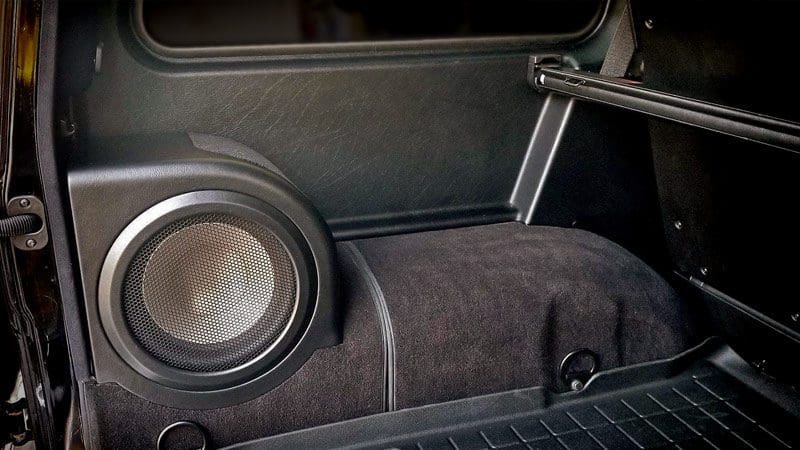 No single upgrade to an audio system offers a larger improvement in sound quality than the addition of a
 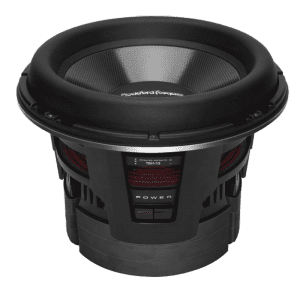 In the simplest of terms, a subwoofer is a large speaker designed to play frequencies below 100 Hz at relatively high output levels. Subwoofers are most commonly available in 10- and 12-inch sizes, but 6.5-, 8-, 13.5- and 15-inch subs are also readily available.
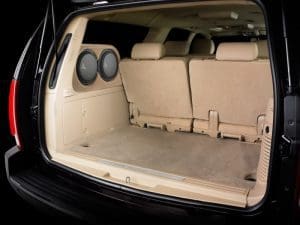 Picking “enough” subwoofer depends on several factors. How loud is loud enough? How much space can you afford to give the subwoofer system? How powerful of an amplifier can your vehicle’s electrical system support? It can be difficult to choose the right sub based on these criteria, especially since different vehicles offer different amounts of cabin gain. Would a single 10-inch sub in a sealed enclosure in the back of a Honda Fit be a suitable solution in a Cadillac Escalade or short-cab Ford F-150?
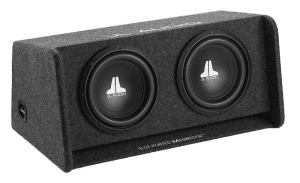 The next step is to decide
 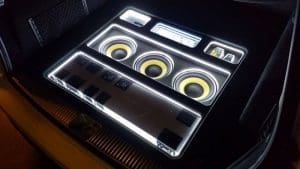 If you want something truly unique, then ask about including LED lighting in the enclosure. You can choose to have a Lexan or Plexiglas window added and illuminate the interior of the enclosure or add acrylic plastic accent pieces that light up. Upgrades at this level are often combined with enclosures finished with multiple materials – different colors of vinyl can provide amazing cosmetics.
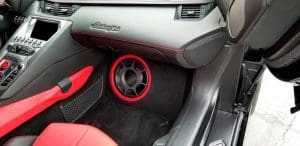 The next step, beyond a simple wooden
 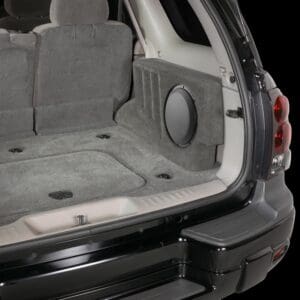 Companies like JL Audio, MTX and Kicker offer subwoofer systems designed for specific models of vehicles. These enclosures are designed to offer impressive performance while minimizing how much space they use. Some companies construct these enclosures from fiberglass in large molds, while others use thick plastics. In most cases, while these enclosures are visible once installed, they are available in materials that match the color of the vehicle interior. An application-specific enclosure is a great way to add amazing bass to a vehicle quickly and efficiently.
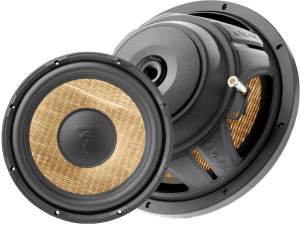 You’ll note that we haven’t discussed the specific features of subwoofers that differentiate one from another. This omission is quite deliberate because we will dedicate an entire article to that topic. In the meantime, it is worth discussing the difference between a conventional subwoofer and a shallow-mount design.
 When it comes to designing
  Up until recently, most recording studios used a pair of high-quality
  There are lots of ways to describe the experience of having the music come from all around the vehicle, but the analogy of a nightclub or – as we old fogies like to call them – a disco might work best. The concept here is that the music will seem to come from all around you. Unlike a performance where you can point to the source of sound from each instrument, it envelops the listening space. In most of these systems, we still balance the system with dedicated left and right channels.
 You may have noticed that we haven’t talked about a live performance that takes place in a concert hall or indoor venue. This has been quite deliberate.
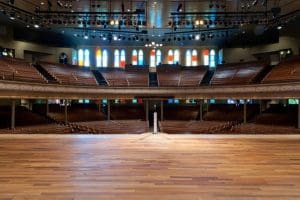
 Another option is to use a signal processor to create a sense of room size. In the 1990s and 2000s, lots of processors had presets for jazz, concert and club settings that added reverberation and delay to dedicated rear channel outputs. These technologies have evolved to more-advanced processing algorithms like Bose Panaray and Quantum Logic Surround from Harman. These systems can analyze the content of a stereo recording and extract information that should be reproduced by side and rear speakers to create an immersive listening experience. If your vehicle has one of these technologies, your
 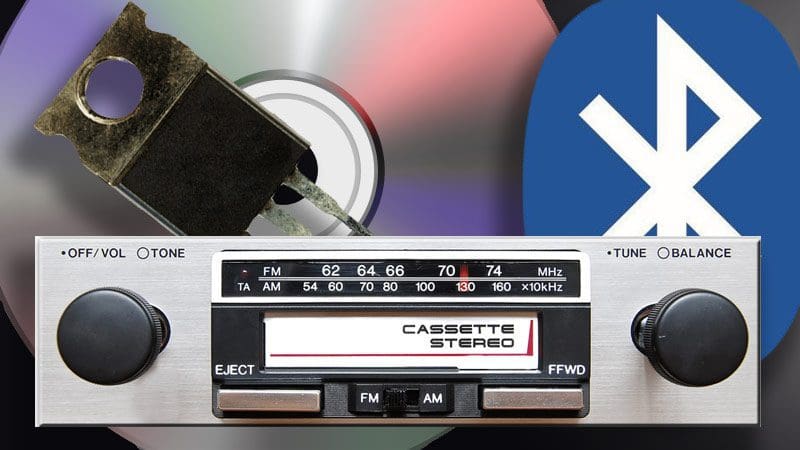 Just as the invention of the transistor eliminated the need for vacuum tubes, advances in technology allow us to create new and unique entertainment solutions with more and more features. We thought it would be fun to take a quick look at a few important car audio technologies throughout history.
 The first car
  Radio was truly the technology that drove car audio systems. The first radio broadcasts were weekly special events that included concerts in 1914 and daily news broadcasts in 1916. On May 20, 1920, XWA – the experimental station of the Canadian Marconi Co. – began regular broadcasts in Montreal. XWA claims status as the first commercial broadcaster in the world. These were all AM (amplitude modulation) stations. FM (frequency modulation) radio was patented in 1933, but it wasn’t until the late ’30s that FM broadcasts became popular. The broadcast of a stereo FM signal was first considered by the FCC in the late 1950s, and a standard was approved in 1961.
 Reel-to-reel recording on magnetic tapes was popular in the 1940s but wasn’t suitable for use in mobile applications. The 8-track was preceded by the Stereo-Pak 4-track cartridge in 1962. The endless-loop cartridge could store both sides of a vinyl album. The 8-track, known originally as the Lear Jet Stereo 8 Track Cartridge, was launched by Bill Lear in 1963. In 1965, Ford offered factory and dealer-installed 8-track options on its Mustang and Thunderbird and on several high-end Lincoln vehicles.
 Most people don’t realize that digital audio (known then as pulse code modulation) was invented in 1937 in Britain and was used in telecommunications. In the late ’60s, Denon pioneered commercial digital recording. The BBC used digital audio transmissions to link its broadcast center to its transmitter in 1972. Sony and Mitsubishi drove the consumer popularization of digital audio in the early ’80s and brought about acceptance by major record companies. The first compact disc was released in 1982 using the Red Book Compact Disc Digital Audio (CD-DA) standard that is still in use today. The first OEM-installed CD players were in the 1987 Lincoln Town Car.
 The benefit of Class D amplifiers is their efficiency and low-to-moderate power levels. Class D amps use high-frequency pulse-width modulation waveforms to switch MOSFETs (metal-oxide-semiconductor field-effect transistors) on and off very quickly to amplify signals. Filter networks on the output of the circuits remove high-frequency noise so that only the audio signal is left to drive our speakers. Class D amplifiers allow manufacturers to produce much more powerful amplifiers that take up very little space. These amplifiers consume less current than their Class AB counterparts.
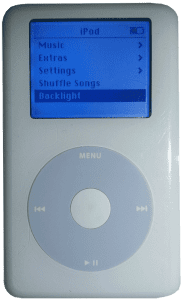 The Apple iPod was introduced in the fall of 2001. The original compact digital media players were only compatible with computers running the Apple Macintosh operating system and as such, sales were limited. In 2003, the iPod 3G was launched with a standard USB port instead of Firewire, making it compatible with Windows-based PCs as well. By June 2003, Apple had sold 1 million iPods.
 Though incorrectly perceived as a hands-free and audio streaming technology,
  Since the very first car radios were built, people were concerned about them being a distraction. Turning the tuner knob to find a local station meant you weren’t focused on the road in front of you. In the late ’90s, we saw drivers with headsets and earpieces making phone calls while they drove. Adding a headset was a common purchase with a new phone. In the mid-2000s, Bluetooth communication replaced wired hands-free connections.